Tutorials by K S Jewellery Designs

Tutorials by K S Jewellery Designs
(Click on the pictures for more details)

Friday 7 November 2014

Around The World Blog Hop – K S Jewellery Designs

The idea behind the Blog Hop is for creative bloggers to write a post based around a few questions.  Their answers offer an insight into their creative thoughts and processes.  The blog ‘baton’ is then passed on to a another artisan and so the trip around the globe gathers pace.
 
I was asked by Tracy of Cinnamon Jewellery to continue the hop.  Tracy is a fellow jewellery maker who inspires me with her beautiful copper, silver and colourful enamel creations.  Her blog is always generously informative about her processes and one of my favourite ones to follow.
 
Why do I create what I do?

This journey I am currently on, is it for ‘business or pleasure’?!  The answer to this has to be for pleasure. Of course, I want to be a highly successful jewellery designer who has customers clambering for my next line of jewellery… but I have to be realistic, don’t I!

I never set out to make jewellery.  By qualifications I am a primary teacher, but I am taking time out from that to pursue my ‘jewellery making’.  I love being creative. It makes me really happy to follow an idea through to a final piece of jewellery.  It’s such a satisfying process and then even more so if someone else likes it enough to buy it and wear it.  I get a real kick out of seeing someone wearing my jewellery.
 
http://ksjewellerydesigns.co.uk/ourshop/prod_3583972-Aqua-Chalcedony-Sterling-Silver-Flower-Pendant-Swirl-Blossom.html


How does my creating process work?

My creating process nearly always starts with a shape.  I see ‘shapes’ everywhere… out the car window, in my garden, within the centre of a flower, in a pattern of a dress someone is wearing, a section of a wrought iron gate…  Shapes that appeal to me are linear with negative space.  That sounds very ‘arty’ when I write that, but I think I know what I mean!  What I am trying to say is that the lines of a shape create another shape within them which is equally interesting to me.
 
 
Sometimes I have to draw shapes I like down on paper as soon as possible so I don’t forget them.  Then later, when I have time, I will ponder over them and decide how I could turn them into a jewellery design.  Other times I feel like the shapes have been mulling around in my brain for a while and it’s only when I rest that they take form.  When I lie in bed trying to get to sleep, instead of counting sheep, I imagine shapes and swirls.  I always have a notebook by my bed for those moments.  The next morning my husband will find me at my workbench, wire and pliers in hand, trying out an idea that came to me the night before.

 
http://ksjewellerydesigns.co.uk/ourshop/prod_3500766-Sterling-Silver-Flower-Drop-Earrings-Peeping-Flowers.html

 What am I working on?

Actually at the moment, I am currently having a ‘break from the norm’!  My usual jewellery designs are often based on my interpretation of natural forms, mainly flowers and leaves. 

However, a couple of days ago I was doodling spirals on my shopping list (!) and adding other shapes.  When I looked at what I had drawn, I realised the doodles had a geometric and Aztec feel to them. 
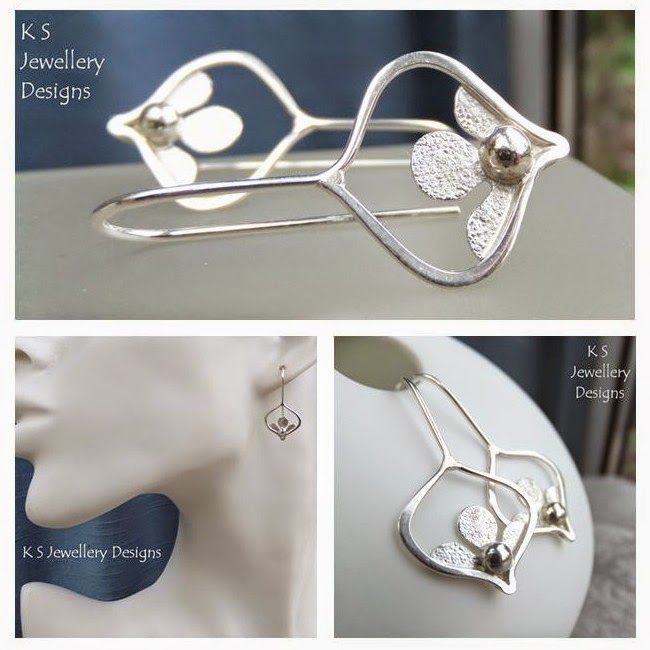
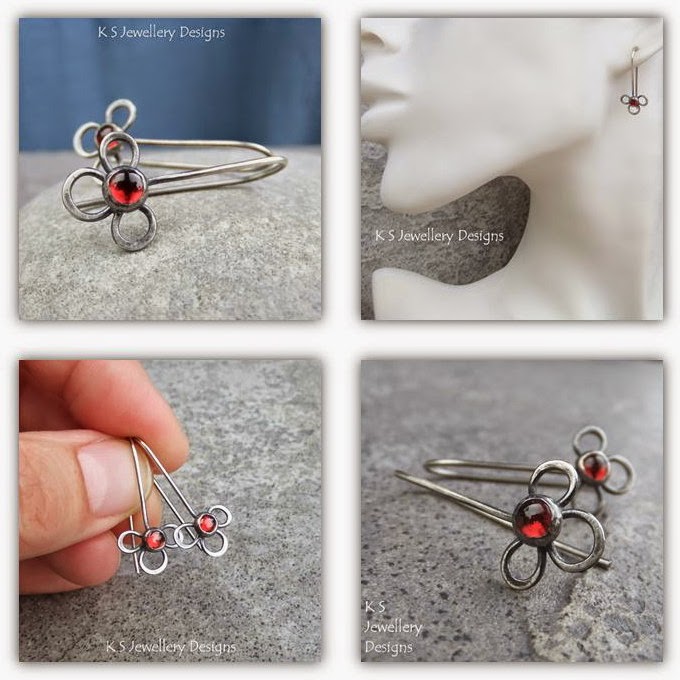
http://ksjewellerydesigns.co.uk/ourshop/prod_3588754-Sterling-Silver-Geometric-Earrings-Aztec-Style.html
 

From that initial design, I made a pair of earrings.  The new challenge in making these earrings was whether I could solder a spiral together and fill the gaps with solder.  Would the solder flow where I wanted it to?  It worked!  Now I am currently working a co-ordinating pendant using similar design principles.


How does my work differ from others in its genre?

I think what makes my jewellery a little different from others is to do with my journey from wirework to metalwork techniques.  My wirework designs have strongly influenced my metalwork designs.


http://ksjewellerydesigns.co.uk/ourshop/prod_2922948-Scapolite-Sterling-Silver-Circle-Frame-Pendant-Necklace.html
 
http://ksjewellerydesigns.co.uk/ourshop/prod_3584224-Kyanite-Heart-Circle-Sterling-Silver-Pendant.html
 

I started out making simple beaded jewellery back in 2008 and then quickly moved onto to wirework.  Wirework suited me as I have always said it is like ‘drawing with wire’. I felt I could recreate my drawings and doodles into jewellery by using wire instead of pencil.  The challenge was always how to join and secure the design and how to embellish the jewellery pieces with gemstones.  Through wirework, I discovered my love of hammering, especially flattening wire and adding texture.

Last year, I attended an adult education course on silversmithing.  I wanted to learn metalworking techniques but I also wanted to work out how I could adapt my wirework designs into metalwork designs.  With metalwork, the challenge is still how to join and secure wire shapes but also how to control the heat of my torch so I don’t damage the wire.  I’m still learning!

* * * * * 
Thank you for reading my blog post.  It has been very thought provoking for me to write it as I don’t often think ‘why’ when I am making my jewellery. It has been good to step back and try and explain my processes.

The next Around the World Blog Hop post will come right across the world from me, a huge ‘hop’ from UK to Australia.  It will be from the very talented Emma from Little Cherry Hill.  I am a big fan of her jewellery.  She has an excellent eye for design and cleverly combines texture and colour within her pieces.  I recommend you take a look!

Thursday 23 October 2014

New Wirework Tutorial - Swirl Leaves - Reduced Introductory Price

I am delighted to announce my new wirework tutorial SWIRL LEAVES is now available for purchase in all my online shops (£3.00/$5.00), however, for a short time, it is for sale in my website shop at a REDUCED INTRODUCTORY PRICE OF ONLY £2.50 (approximately $4.11): http://ksjewellerydesigns.co.uk/ourshop/prod_3570296-SWIRL-LEAVES-Wirework-Jewellery-Tutorial-emailed-PDF-download.html

http://ksjewellerydesigns.co.uk/ourshop/prod_3570296-SWIRL-LEAVES-Wirework-Jewellery-Tutorial-emailed-PDF-download.html

Saturday 27 September 2014

Giveaway from K S Jewellery Designs

 
https://www.facebook.com/KSJewelleryDesigns/photos/a.199556913454417.49815.128806170529492/705042899572480/?type=1&theater
 
THERE ARE 4 VARIATIONS TO CHOOSE FROM:
1.       Rustic Flower #1 Earrings
2.       Rustic Flower #1 Studs
3.       Rustic Flower #2 Earrings
4.       Rustic Flower #2 Studs
 
Giveaway terms and conditions:
·    Please ‘Like’ my Facebook page (or be an existing ‘liker’)
·    Please comment below my Facebook post and tell me which is your favourite pair of earrings (‘share’ with your friends if you would be kind to but this is NOT part of the terms of this giveaway)
·    This giveaway is open to all my Facebook ‘likers’ – worldwide
·     I will put all entrants’ names into a hat and draw one winner on MONDAY 6TH OCTOBER 2014 – check back on my Facebook page to see if you have been lucky to win your favourite

Friday 12 September 2014

Peeping Flowers

Those who know my jewellery designs well will know I have a flower obsession and I can't seem to stay away from them when creating jewellery.  Last week I had a pause from custom orders and started sketching and doodling.  I picked up some wire and some off cuts of flowers and created these earrings which I've named 'Peeping Flowers' as it looks to me as if the flowers are peeping through the frame!

Sterling Silver Peeping Flowers Earrings
 
Of course, once I created these, I started thinking about further Peeping Flower designs.... What if I changed the shape of the frame?... What if I changed the position of the flower?... I tried a circular frame... 
 
Sterling Silver Peeping Flowers Circle Earrings
 
Next I wondered how I could incorporate a gemstone within a Peeping Flower design and also changing the flower to a wire flower...

Rhodolite Garnet Sterling Silver Peeping Flower Earrings
 
Although this version was quite fiddly to create, and I had to be patient and careful with the heat of my torch,  I am really happy with it and am planning more of the same with different gemstones.  I kept changing my mind on which gemstone to set in these earrings and ended up going with these dark pink rhodolite garnet but I am also imagining this design in blue and purple and green and orange.....

Saturday 23 August 2014

*** BARGAIN OFFER FOR TEN CUSTOMERS ONLY ***

*** BARGAIN OFFER FOR TEN CUSTOMERS ONLY ***

http://ksjewellerydesigns.co.uk/ourshop/prod_3480887--BARGAIN-10-customers-only-ALL-12-TUTORIALS-FOR-12-save-24.html

To celebrate having a wirework tutorial published in Making Jewellery magazine this month, I am offering 10 customers the chance to buy all 12 of my wirework tutorials at a BARGAIN PRICE of only £12 (normal price of a tutorial is £3 each which means a huge saving of £24 if you were to buy them individually!).

Follow this link for the offer... http://ksjewellerydesigns.co.uk/ourshop/prod_3480887--BARGAIN-10-customers-only-ALL-12-TUTORIALS-FOR-12-save-24.html

Friday 22 August 2014

I've been published!

I've been published.... in Making Jewellery magazine (September issue 71).  I've written a short tutorial entitled 'Falling Leaves' which shows you how to make leaf themed jewellery (earrings, necklace and pendant).


It was a lovely thing to be asked to do this but I did worry about being limited to only 9 photos!  For those of you who know my wirework tutorials, I like to include lots of photos as I think 'learning by seeing' goes a long way to helping 'learning by doing'. 

As a side note... I personally am not very good at just 'learning by listening or reading'... my mind just wanders away and I find I've missed some of the facts. Like when someone gives you directions.  After they've said 'Take the first left and go right at the lights', I've already forgotten the first instruction.  However, give me a map or a drawing and I'm a happy girl!


Anyway, back to my tutorial, I spent a long time selecting the 9 photos I thought would help the reader understand how to make the designs.  I was also restricted to a word limit per step which was also a challenge.

Here's the final pieces I made whilst creating the tutorial.  I used sterling silver wire and beautiful green kyanite beads:


N.B. Check out page 44 too as the very talented Tracy Smith of Cinnamon Jewellery has written a fab tutorial on how to torch enamel copper.  You can read her blog post about it here: http://cinnamonjewellery.blogspot.co.uk/2014/08/my-first-torch-enamel-project-in-making.html

Monday 18 August 2014

Pebble Framed Jewellery

I have been working on a new flower design and co-ordinating rings by framing gemstones in little silver balls.  This has certainly been a technique that I found needed practice but I think I'm getting there!

Rainbow Moonstone Pebble Blossom Pendant

My first couple of attempts were really frustrating, as when I placed the little silver balls (handmade from scraps of silver wire and sheet) around the bezel soldered onto a circle of silver sheet, I would get to a certain amount of balls and couldn't seem to place any more without others falling off.  I felt a bit like a rubbish sheep herder whose sheep keep running around the place instead of in the pen!

I also discovered that it is important not to have the balls too big or it's really difficult to set the stone... you can imagine at what point I found that out!  Oh well, 'you live and learn' is my motto at the moment and I am loving this journey and can't expect to get everything right first time.

Next time I tried sanding the bottom of all the little balls to make them have a flat area to sit on and to make them a little shorter around the bezel.  This was very fiddly and time consuming.  However, this didn't really make any difference to the little balls slipping off as more got added around the bezel.  Grrrrr......

I then discovered if I fluxed around the bezel before placing the balls, that the flux held the balls in place.  Yay!  The only downside to this is that when I heated up the bezel and balls, the flux bubbled and expanded and I spent quite a lot of time replacing and repositioning the balls.

Rainbow Moonstone Pebble Frame Ring

This final method has been the most reliable and, with some patience and careful handling of the heat of my torch, I have had success.

I have been pondering variations of this design and here is another Pebble Blossom pendant I made today where I filed and sanded down the little balls for a 'flattened' finish.  I really like this effect.

Amethyst Pebble Blossom Pendant

Wednesday 9 July 2014

Textured Earrings Giveaway

Time for another giveaway!

Follow this link to my latest Facebook giveaway: https://www.facebook.com/photo.php?fbid=665007290242708&set=a.199556913454417.49815.128806170529492&type=1&theatre

https://www.facebook.com/photo.php?fbid=665007290242708&set=a.199556913454417.49815.128806170529492&type=1&theater
 
THERE ARE 4 VARIATIONS TO CHOOSE FROM:
1.       Textured Flower Stud Earrings
2.       Textured Heart Hoop Earrings
3.       Textured Heart Earwire Earrings
4.       Textured Star Stud Earrings
 
Giveaway terms and conditions:
·         Please ‘Like’ my Facebook page (or be an existing ‘liker’)
·         Please comment below my Facebook post and tell me which is your favourite pair of earrings (‘share’ with your friends if you would be kind to but this is NOT part of the terms of this giveaway)
·         This giveaway is open to all my Facebook ‘likers’ – worldwide
·         I will put all entrants’ names into a hat and draw one winner on SUNDAY 20TH JULY 2014 – check back on my Facebook page to see if you have been lucky to win your favourite

Monday 16 June 2014

Pebbles and balls

Recently I have been exploring the technique of adding balls (or as I like to call them 'pebbles'!) to my jewellery designs.

I started by adding little silver balls to wire as in these Ethnic Heart Earrings:


The process of soldering the balls to the hammered wire was quite a challenge and in the end they became fixed by a mixture of soldering and fusing.  I do like the final look but realised that controlling the heat of my torch was very important to whether the balls or the wire ending up fusing together.  This technique will need more practice!

Following on from the soldering/fusing idea, I then added pebbles to a ring as in these Pebble Trio Ring:

 
And more pebbles added to this Labradorite Pendant (love this gemstone!):
 
 
On to the next challenge... I wanted to create a frame of pebbles around a gemstone.  Using labradorite again, I created this Pebble Frame Ring.  NB. The cabochon in the photo is not yet set as I decided to wait until I know the final size of the ring:
 
 
And my most recent 'pebble' adventure was to hammer the balls before adding them to a jewellery piece.  In this Aqua Chalcedony Pebble Framed Bangle, I used two different sized pebbles to create the frame around the bead:


Saturday 24 May 2014

Textured silver

I love bright smooth shiny silver ... however ... I also love textured silver which changes the way the light catches the metal. When I started learning metalworking techniques, my husband produced an old set of stamps and punches that were handmade by his grandfather...


Using one of these stamps, I can create the random pattern of my Rustic Disc collection of jewellery...


And recently I have been using another of the stamps to create the light texture on my Mini Flower jewellery...


... and my Textured Drop pendant and earrings..


Thank you Grandpa for adding a new dimension to my jewellery making!

Saturday 26 April 2014

Latest giveaway from K S Jewellery Designs

This morning I announced my latest giveaway on my Facebook page...


Would you like to win one of my Mini Flower Earrings?  Please read the terms and conditions below.
 
There are 4 variations to choose from:
1.      Mini Flower Stud Earrings (oxidised)
2.      Mini Flower Dangly Earrings (oxidised)
3.      Mini Flower Stud Earrings (shiny)
4.      Mini Flower Dangly Earrings (shiny)

Giveaway terms and conditions:
·         Please ‘Like’ my Facebook page (or be an existing ‘liker’)
·         Please comment below my Facebook post about my giveaway and tell me which is your favourite pair of earrings (‘share’ with your friends if you would be kind to but this is NOT part of the terms of this giveaway)
·         This giveaway is open to all my ‘likers’ – worldwide
·         I will put all entrants’ names into a hat and draw one winner on 9th May 2014 – check back then to see if you have been lucky to win your favourite

Wednesday 23 April 2014

Playing about with wire - my favourite pastime

Recently I have been enjoying mixing wirework and metalwork techniques often referring back to some of my previous wirework designs.  Here is the outcome of playing with some wire and re-visiting the idea of wire blossoms.

http://ksjewellerydesigns.co.uk/ourshop/prod_3268839-Garnet-Sterling-Silver-Flower-Earrings-Mini-Blossoms.html
Garnet Mini Blossoms Sterling Silver Earrings

And here are some wire blossoms I made out of wirework back in 2010...


Saturday 19 April 2014

Rings, rings and more rings...

I love wearing rings so it's probably not a surprise to hear that I love making rings too.  Over the last few months I have made lots of rings and thought I would share a few here on my blog...

STACKING RINGS
 
http://ksjewellerydesigns.co.uk/ourshop/prod_3110201-Kyanite-Sterling-Silver-Stacking-Gemstone-Ring-Trio-MADE-TO-ORDER.html
Kyanite gemstone ring between two gently textured rings

http://ksjewellerydesigns.co.uk/ourshop/prod_3225624-Amethyst-Sterling-Silver-Stacking-Gemstone-Ring-MADE-TO-ORDER.html
Amethyst cabochon within a textured circle

http://ksjewellerydesigns.co.uk/ourshop/prod_3198683-Opal-Triplet-Sterling-Silver-Stacking-Gemstone-Ring-MADE-TO-ORDER.html
Opal triplet cabochon within a textured circle (oxidised for detail) - so many colours in this cabochon!
 
 
SPINNER RINGS
 
 http://ksjewellerydesigns.co.uk/ourshop/prod_3130563-Sterling-Silver-Spinner-Ring-Bark-Texture-MADE-TO-ORDER.html
My first ever spinner ring (thanks to a very informative video by the wonderful Soham Harrison)

https://www.facebook.com/photo.php?fbid=624001387676632&set=a.199556913454417.49815.128806170529492&type=1&theater
Hugs and Kisses Ring - this was a custom order for a lovely friend who is helping me to stretch my metalworking skills and develop new designs
 
 
GEMSTONE RINGS

http://ksjewellerydesigns.co.uk/ourshop/prod_3259561-Labradorite-Sterling-Silver-Gemstone-Ring-MADE-TO-ORDER.html
Gorgeous labradorite - setting beads with corners is quite challenging but I was happy with the result

http://ksjewellerydesigns.co.uk/ourshop/prod_3261015-Kyanite-Sterling-Silver-Teardrop-Gemstone-Ring-MADE-TO-ORDER.html
I love kyanite and this teardrop bead is so beautiful

Tuesday 11 March 2014

Rustic Discs Collection

Over the past couple of weeks I have been creating jewellery based around the same theme.  I am naming this jewellery collection 'Rustic Discs'.

The first pieces I made with this theme were a pair of stud earrings that came about as an idea for a birthday present for my mother-in-law...


I cut out some little sterling silver discs with my trusty disc cutter and experimented with some textured stamps that my husband passed onto me that had belonged to his grandfather.  I decided I really liked the random texture created by one of the stamps and the marks it left on the metal.  I soldered on little misshaped balls (deliberately squashed and battered a bit) and earposts and put them in my tumbler.  This is when a little bit of magic seemed to happen because when the came out after an hour or so, the texture had taken on an extra sparkle (bottom photo).  I chose to oxidise them for my mother-in-law (top photo) and this gave the texture an interesting depth.

Following the earrings, I made a little Rustic Disc Pendant creating another texture on the larger disc...

 
A few days later, I created a necklace and another pendant.  I love the way the light catches on the texture and the doming of the discs seems to help the light to bounce around...


The necklace sold really quickly and I offered to make the customer a co-ordinating pair of earrings.  Like me, she doesn't really wear stud earrings (I have wonky holes!), so I offered to create a pair of earrings with earwires...


Another addition to my collection is a stacking ring which can be worn alone or alongside other rings...


I am currently pondering a Rustic Disc bracelet or bangle... watch this space!  In the meantime, if you would like to see further details about any of the jewellery in my Rustic Disc collection, you can find them in my website shop, my Etsy shop or my Folksy shop.