Tutorials by K S Jewellery Designs

Tutorials by K S Jewellery Designs
(Click on the pictures for more details)

Saturday 24 January 2009

Little Flowers

I think I have finally cracked my new design of little flowers made from one length of wire. It took several attempts and quite a bit of silver wire (why, oh why, didn't I practice with silver plated wire first?!). The design is based on my Daisy Flower set I made last summer (necklace, earrings and hairspins).


This time I wanted to include a gemstone in the centre that is held in place by the end of the wire. I worked on this over several evenings struggling to get a final piece that I was happy with. I was probably 're-inventing the wheel' (my husband often accuses me of this) but I haven't seen a tutorial that offers this design. Also, it is quite satisfying when you puzzle through your difficulties. Mine were mainly how to make the flower sturdy as well as neat.


I reckon there is a lot of potential in this design and have already made a pendant to match the amethyst earrings and am thinking about pointed petals, more petals, double petals, hammered petals, textured petals ..... Any further suggestions, anyone?

Sunday 18 January 2009

Sea Treasure

I was photographing my latest jewellery pieces this morning and taking advantage of some sunshine (although the weather was a bit of a pain with clouds moving across the sky constantly changing the light) and my husband was having a bit of a clear out in one of our cupboards. He came across a lovely material covered box (a present from a friend a long time ago) and said "What's in here?" On opening we found our 'sea treasure'! The treasure being a collection of beautiful shells we found on a memorable holiday in Paxos, Greece back in 2000.

I had completely forgotten about these beauties and such perfect timing to find them as I immediately used them as background for my jewellery photos.

Wednesday 14 January 2009

Why are bracelets so hard to photograph?

Phew! I have finally finished my Blue Topaz Swirl Bracelet. I started it at Christmas and was all fired up about it - I even worked on it on Christmas Day during a moment of quiet (there weren't many I can assure you!). For some reason though it had sat unfinished for a couple of weeks now whilst I got on with other things. It is based on my Labradorite Swirl Bracelet I made last spring. I kept this one for myself and have had quite a few compliments, so I thought it was about time I made another with a different gemstone. I chose a light coloured stone this time - very light blue topaz for an icy winter's day.


Using the labradorite bracelet and my previous sketches and notes, I actually found it quite easy to replicate and was determined to make the new bracelet better than the first one, which has quite a few scratches from my pliers and the wire is quite dented in places (another reason I kept it for myself). This time I made up the swirls and tumbled them in my jeweller tumbler to remove any scratches and I also tried to be much neater with my wire wrapping to hold the swirl links together.


Anyway, to the main point of this post - why are bracelets so hard to photograph? I spent ages this morning placing the bracelet on different surfaces looking for the best angles. It was hard to take a picture of the whole bracelet without either being too far away and losing detail or having part of it out of focus. It also didn't help that it was very grey and misty here and I always take my photos in natural light. However, I did find my new gorilla tripod very useful. This was an excellent Christmas present from my husband and really helps me keep the camera steady as I move around. It has very grippy, bendy legs and is easy to manipulate into lots of different positions. I think these photos are the best I can take in the light that's available but might try again on a brighter day.

Monday 12 January 2009

Art Clay Silver - Pendants and Earrings

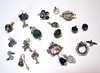
Here are the pendants after firing and burnishing. Picture 1 is the hammered heart and picture 4 is the second heart I made with the circles texture. As I said before, I am pleased with the result of the first one - it's funny how an accident can turn out in the end - maybe it was fate?!

I will incorporate these pendants into some necklace designs but at the moment am pondering about gemstone colours and also whether to go simple or more detailed. Also, I haven't drilled a hole in the leaf pendant until I am sure how I am going to use it.


I had a right argument with my husband whether to drill the holes before or after firing. I said 'after' and he said 'before'. I was worried I might crack the pieces if I drilled them before. So, ever trying to compromise, we tried both (the second heart I drilled before firing). I have to admit, I think he was right as, when using my little hand-held drill, it was really hard on the fired pieces and my wrists started aching immediately.


The sun discs turned out quite well and I have put them onto some of my 'loopy hoop' earwires. They remind me of Aztec suns. When I showed them to my seven year old son he said he thought I should put some gemstones on the earrings. Mmm... I think he might be right, maybe carnelian for the fire of the sun. Although I have some great natural turquoise beads that might look quite good. I think I will have a play around with these earrings before I put them up for sale.


The other earrings I made have a circles texture. I love the way burnishing highlights the raised parts and the indented areas stay with the satin finish from the brushing. I'm happy with these earrings as they are and will be listing them on Etsy, eBay and Artfire later today.

Sunday 11 January 2009

More haste, less speed

I've been busy today with my silver clay and am certainly learning the lesson of 'more haste, less speed'.

I wanted to try out my new mould making stuff called 'Oyumaru'. It's amazing - little strips of neon coloured plastic-like material that softens in hot water. I made a few moulds from some rubber stamps I had from a while back and was really pleased with the detail. Below are the pieces I made after drying and filing.

After taking this photo, I went on to fire them on my gas hob and when I did my heart went 'pop' (quite literally!). Obviously I hadn't left it to air dry completely. Well, in fact I had tried to speed up the process by putting them in my oven at a low temperature but foolishly hadn't thought that the heart would need more time to dry. The result was the heart had a little volcano shape popping out of it near the bottom. I tried to file it out but it changed the texture pattern. All was not lost, however, as I ended up filing and hammering out all the texture and then re-texturing it with my little pointed hammer. I'm actually quite pleased with the result. I'll post a picture tomorrow.

p.s. I've now made 'heart #2' from the same mould and have sensibily left it to air dry overnight!

Wednesday 7 January 2009

My Museum!

This is fun - turn your pictures into works of art.

I found this link on Corra's blog (http://decorshandmades.blogspot.com/) and thought I'd have a try.

Modern Art Museum


Modern Art Museum


Modern Art Museum


Museum


Go to http://www.dumpr.net/museumr.php